![Yoravex – Smart Tech Guides, Fixes & Tips [2025]](https://yoravex.com/wp-content/uploads/2025/08/cropped-wwwwwwwwwwwwwwwwww.png)
If you’re running into issues with Windows 11, you’re definitely not alone – Windows 11 errors are common. From stubborn update errors to mysterious blue screens and lagging performance, these Windows 11 errors can seriously slow down your day. Thankfully, most have straightforward solutions you can try yourself, saving you the hassle of a lengthy support call. Before you start worrying about a full reset or costly repairs, let’s look at how you can tackle some of the most common Windows 11 errors on your own.
Key Takeaways
- Run the Windows Troubleshooter to fix common Windows 11 errors via Settings to automatically detect and fix common issues.
- Update all drivers and Windows itself through Windows Update and Device Manager to resolve compatibility and stability problems.
- Restart your PC and router to quickly fix most connectivity and performance glitches.
- Free up disk space and disable unnecessary startup programs in Task Manager to boost system speed.
- Run “sfc /scannow” in Command Prompt to repair corrupted system files and prevent frequent crashes or BSODs.
Resolving Windows Update Failures
Windows Update failures are among the most common issues you’ll encounter in Windows 11, but you can usually resolve them with a few straightforward steps. First, run the Windows Update Troubleshooter found in Settings > System > Troubleshoot > Other troubleshooters. This tool automatically detects and fixes many update-related Windows 11 errors. If that doesn’t work, restart your device and check your internet connection. Next, clear the update cache by opening Command Prompt as administrator and running `net stop wuauserv`, deleting the contents of `C:WindowsSoftwareDistribution`, then running `net start wuauserv`. Also, make sure you have enough disk space and temporarily disable third-party antivirus software, as it can interfere with updates. Finally, try manually downloading and installing updates from the Microsoft Update Catalog if automatic updates keep failing.
Fixing Wi-Fi and Network Connectivity Problems
Whether you’re working, streaming, or gaming, a stable internet connection is essential—and network issues can quickly bring everything to a halt. If your Windows 11 device struggles to connect to Wi-Fi, start by toggling Airplane Mode on and off, then reconnect to your network. Restart your router and PC to rule out temporary glitches. Next, run Windows’ built-in Network Troubleshooter: go to Settings > Network & Internet > Status > Network Troubleshooter. Update your Wi-Fi drivers using Device Manager for optimal compatibility. If you’re still stuck, forget the network in Wi-Fi settings and reconnect by entering your password again. Check for VPN or firewall conflicts, as these can block connectivity. Finally, reset network settings under Settings > Network & Internet > Advanced network settings.
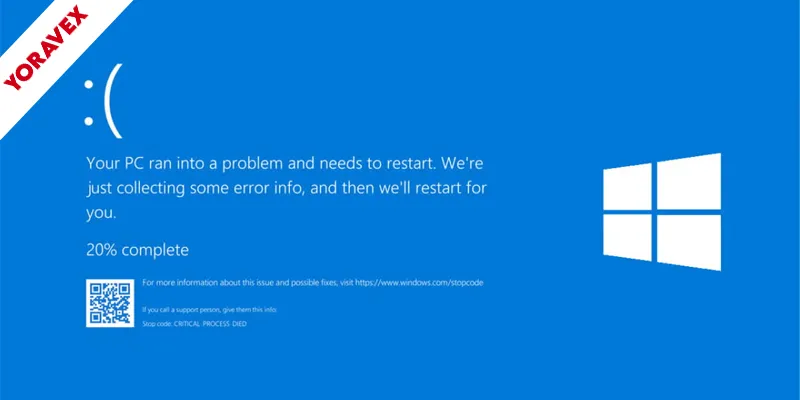
Addressing Blue Screen of Death (BSOD) Errors
If your computer suddenly displays a Blue Screen of Death (BSOD), don’t panic—it’s one of the many common Windows 11 errors users face that signals a serious system problem. Usually, BSODs are critical Windows 11 errors often caused by hardware issues, incompatible drivers, or corrupted system files. First, note any error codes or messages on the screen, as these help identify the cause. Restart your PC and check for Windows updates, since Microsoft often releases fixes for known problems. Update your drivers, especially for graphics and network devices, using Device Manager. Run the built-in Windows Memory Diagnostic tool to check for faulty RAM. You should also run “sfc /scannow” in Command Prompt to repair corrupted system files. If BSODs persist, unplug unnecessary peripherals and scan for malware to rule out infections.
Solutions for Slow System Performance
When your PC starts dragging through everyday tasks, it’s frustrating and disruptive. To speed up Windows 11, first check what’s running in the background. Open Task Manager (Ctrl + Shift + Esc) and end processes you don’t need. Next, disable unnecessary startup programs by right-clicking the Start button, choosing Task Manager, and selecting the Startup tab. Only keep essential apps enabled. Free up disk space by deleting temporary files—go to Settings > System > Storage and use Storage Sense. Make sure Windows and drivers are up to date for optimal performance. If you’re still experiencing slowness, consider uninstalling rarely used programs or upgrading your RAM. Finally, restart your PC regularly to clear out lingering processes and refresh system resources.
Troubleshooting App Crashes and Freezes
Ever wonder why your favorite app suddenly stops responding or closes without warning? App crashes and freezes are common in Windows 11, but you can fix most Windows 11 errors yourself. Start by making sure your system is up to date. If the problem continues, try these quick solutions:
App crashes and freezes in Windows 11 are common, but most issues can be fixed quickly with a few simple steps.
- Update the app: Outdated versions often cause instability. Update through the Microsoft Store or the app’s website.
- Restart the app and your PC: A simple restart can clear temporary glitches.
- Check for conflicting programs: Background software can interfere. Close unnecessary apps before relaunching.
- Reset or reinstall the app: Go to Settings > Apps, select the troublesome app, and choose “Reset.” If that fails, uninstall and reinstall it.
Following these steps should resolve most app app crashes, freezes, and other Windows 11 errors.
Repairing File Explorer Issues
Tackle File Explorer troubles head-on by recognizing the signs—slow loading, frequent crashes, or missing files can disrupt your workflow in Windows 11. Start by restarting File Explorer: press Ctrl + Shift + Esc, find “Windows Explorer” in Task Manager, right-click, and select “Restart.” If issues persist, clear File Explorer’s history by opening Options from the View tab and clicking “Clear” under Privacy. Sometimes, third-party extensions cause problems. Disable them by running “shell:extensions” in the Run dialog and turning off suspicious add-ons. You can also run the built-in System File Checker—open Command Prompt as administrator and type “sfc /scannow.” If File Explorer remains unresponsive, it may be linked to Windows 11 errors, consider creating a new user profile, as corrupt profiles can affect stability. These steps should restore smooth navigation.
Dealing With Audio and Sound Malfunctions
Run into sound problems on Windows 11, and you’ll quickly notice how disruptive they can be—whether it’s no audio at all, distorted sound, or devices not being detected. The good news is, you can usually fix these Windows 11 errors with a few straightforward steps. Start by checking your physical connections and making sure your audio device is plugged in and powered on. Next, confirm that Windows isn’t muted or set to the wrong playback device. If the problem persists, try these quick fixes:
- Right-click the sound icon, select “Troubleshoot sound problems,” and follow the prompts.
- Update your audio drivers through Device Manager.
- Restart the Windows Audio service by searching “Services” and locating it.
- Disable audio enhancements under Sound settings if you hear distortion.
Test after each step to isolate the issue.
Correcting Printer and Peripheral Connection Errors
When your printer or other peripherals refuse to connect on Windows 11, it can bring your workflow to a sudden halt. First, check the physical connections—ensure cables are secure or that your device is paired via Bluetooth. Next, try unplugging the device and plugging it back in, or turning Bluetooth off and on. Open Settings > Devices and remove the device, then add it again. For network printers, make sure you’re on the correct Wi-Fi network and the printer’s powered on. Use the built-in Troubleshooter: go to Settings > System > Troubleshoot > Other troubleshooters and select your device type. Restart your PC after making changes. Often, these steps resolve most Windows 11 errors related to printer and device connections.
Managing Driver Compatibility Problems
While Windows 11 usually finds and installs the right drivers automatically, you might still run into compatibility problems—especially after an update or with older hardware, leading to Windows 11 errors. These issues can cause devices to malfunction or stop working altogether. To tackle driver compatibility problems, you’ll want to be proactive and methodical. Here’s what you can do:
- Check for Updates: Go to Settings > Windows Update and look for driver updates. Microsoft often releases fixes for known compatibility issues.
- Use Device Manager: In Device Manager, right-click the problematic device and choose “Update driver” or “Roll back driver” if the latest version isn’t working.
- Visit Manufacturer’s Website: Download the latest drivers directly from your device or component manufacturer.
- Uninstall and Reinstall: Uninstall the driver, then restart your PC to let Windows reinstall it automatically.
Frequently Asked Questions
How Do I Customize the Windows 11 Start Menu Layout?
To customize the Windows 11 Start menu layout, open Settings, then go to Personalization > Start. Here, you can choose which folders appear, rearrange pinned apps, and adjust layout settings. Drag apps to organize them easily.
Can I Roll Back to Windows 10 From Windows 11 Safely?
Yes, you can roll back to Windows 10 from Windows 11 safely if it’s been less than 10 days since you upgraded. Just go to Settings > System > Recovery and select “Go back” to start.
How Do I Enable Dark Mode Across All Apps in Windows 11?
To enable dark mode across all apps in Windows 11, open Settings, go to Personalization, then Colors, and select “Dark” under Choose your mode. Some apps may need individual dark mode settings adjusted in their preferences.
What Are the Best Ways to Organize Desktop Icons Automatically?
To organize your desktop icons automatically, right-click your desktop, select “View,” and choose “Auto arrange icons.” You can also group icons by type or name. Try third-party tools if you want more customization and advanced sorting options.
How Can I Schedule Automatic Shutdowns in Windows 11?
You can schedule automatic shutdowns in Windows 11 by using Task Scheduler. Open it, create a new task, and set “shutdown.exe /s /f /t 0” as the action. Pick your preferred schedule, then save.
Conclusion
By tackling these common Windows 11 errors with straightforward fixes, you’ll keep your PC running smoothly and avoid unnecessary frustration. Whether you’re updating drivers, clearing out old files, or rebooting your router, these quick fixes for Windows 11 errors can save you time and stress. Stay proactive with regular maintenance, and you’ll sidestep most issues before they start. If problems persist, don’t hesitate to seek expert help—your productivity and peace of mind are worth it!