![Yoravex – Smart Tech Guides, Fixes & Tips [2025]](https://yoravex.com/wp-content/uploads/2025/08/cropped-wwwwwwwwwwwwwwwwww.png)
If your Windows 11 computer feels sluggish or struggles with multitasking, you might need to optimize RAM Windows 11 to fix limitations. There are several practical, no-cost steps you can take to optimize RAM Windows 11 performance and make the most of your system’s memory. By targeting background processes, startup programs, and built-in tools, you can streamline your PC without spending a dime. Before you start making upgrades, consider what you can do right now to reclaim valuable memory and boost speed.
Key Takeaways
- Disable unnecessary startup programs in Task Manager to prevent them from consuming RAM at boot.
- Turn off background apps in Settings to optimize RAM Windows 11 by reducing ongoing memory usage by rarely used applications.
- Regularly use Storage Sense to automatically delete temporary files and free up system resources.
- Check Task Manager to identify and close memory-intensive processes that are not essential.
- Keep Windows and all device drivers updated to fix memory leaks and fully optimize RAM Windows 11 management.
Identifying Resource-Hungry Processes in Task Manager
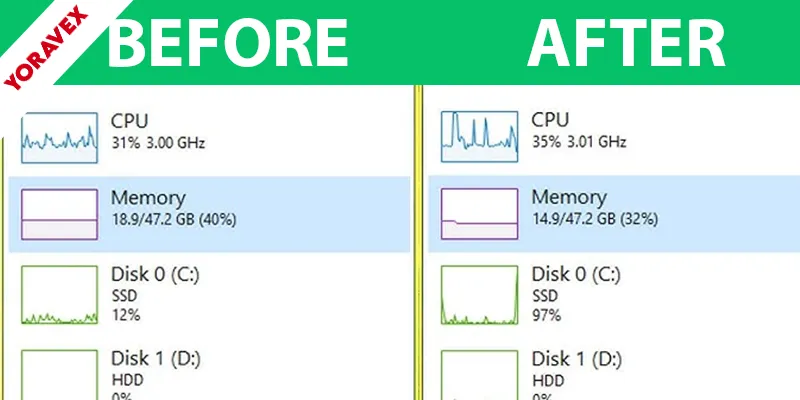
One of the quickest ways to spot what’s eating up your RAM in Windows 11 is by opening Task Manager. To do this, right-click the taskbar and select “Task Manager,” or press Ctrl+Shift+Esc. Once it’s open, click the “Processes” tab. Here, you’ll see a list of running applications and background processes. Look at the “Memory” column to identify which programs are using the most RAM.
Sort the list by clicking the “Memory” heading—this puts the biggest RAM users at the top. Take note of any unfamiliar or unusually large processes. If you don’t recognize a process, right-click it and select “Search online” to learn more. Don’t end tasks unless you’re sure they’re not essential for Windows.
Disabling Startup Programs for Faster Boot Times
After spotting which programs use the most memory, you might notice some that automatically start with Windows. These startup programs can slow down your boot time and eat up valuable RAM before you even open your first app. Disabling unnecessary startup programs is a quick way to boost performance and keep your system lean.
To manage startup items, press Ctrl + Shift + Esc to open Task Manager, then switch to the “Startup” tab. Here’s a quick guide:
| What You See | What It Means |
|---|---|
| Enabled | Program starts with Windows |
| Disabled | Program won’t auto-start |
| Startup Impact | Shows how much each app slows boot |
Right-click any item and choose “Disable” for anything you don’t need right away. This frees up RAM and gives you a noticeably faster Windows 11 experience.
Turning Off Unnecessary Background Apps
While you might expect only open apps to use memory, Windows 11 allows many background apps to run even when you’re not actively using them. These apps often sync data, send notifications, or perform updates, quietly consuming valuable RAM. To optimize your system, you should turn off unnecessary background apps.
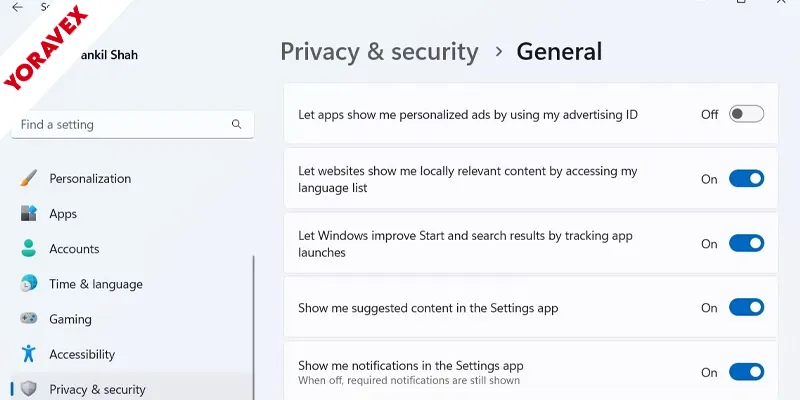
Go to Settings > Apps > Installed apps. Click the three-dot menu beside an app, select “Advanced options,” and under “Background apps permissions,” set it to “Never.” Focus on disabling apps you rarely use or don’t need running in the background. This simple change can free up RAM and optimize RAM Windows 11 and improve your system’s responsiveness.
Review background app permissions regularly, as updates or new installations can re-enable them without notice. Staying proactive helps keep your PC running smoothly.
Using Storage Sense to Clean Temporary Files
Disabling background apps frees up RAM, but lingering temporary files can still slow down your system. Windows 11 includes a built-in feature called Storage Sense that automatically cleans these files, helping your system optimize RAM Windows 11 more efficiently. To enable Storage Sense, open Settings, go to System, then Storage. You’ll see Storage Sense at the top—toggle it on. You can also configure how often Windows deletes temporary files, empty recycle bins, and remove old downloads. Just click “Storage Sense” for more detailed options.
Adjusting Visual Effects for Optimal Performance
Although Windows 11 offers sleek animations and visual effects, these enhancements can consume valuable system resources and slow down performance on devices with limited RAM. You can optimize RAM Windows 11 to reclaim memory and boost speed by adjusting these visual settings. Open the Start menu, type “Adjust the appearance and performance of Windows,” and select it. In the Performance Options window, choose “Adjust for best performance” to disable most effects, or manually uncheck specific features like animations and shadows. Click “Apply” to confirm your changes.
Disabling or minimizing visual effects helps your system allocate more RAM to core tasks and applications, reducing unnecessary memory usage. If you notice lag or stuttering, tweaking these settings can provide a smoother, faster experience without sacrificing essential Windows 11 functions.
Leveraging Windows Memory Diagnostic Tool
If you’re experiencing frequent crashes or slowdowns, your computer’s RAM might be at fault. Windows 11 includes a built-in tool called Windows Memory Diagnostic that helps you check your system’s memory for errors. To use it, press Start, type “Windows Memory Diagnostic,” and select the app. Choose “Restart now and check for problems.” Your PC will reboot and scan and optimize RAM Windows 11 to catch issues early.
When the scan finishes, Windows will automatically restart and show results after you log in. If any errors are detected, it’s a sign your RAM could be causing performance problems. In that case, consider replacing faulty sticks. Regularly running this tool lets you catch memory issues early, optimize RAM Windows 11 and improve system stability without needing third-party software or extra costs.
Managing Virtual Memory Settings
Once you’ve checked your RAM for errors, adjusting your virtual memory settings can further optimize RAM Windows 11 for performance. Virtual memory lets Windows use a portion of your hard drive as extra RAM, especially helpful when you need to optimize RAM Windows 11. To tweak these settings, right-click Start, select System, then Advanced system settings. Under Performance, click Settings, then the Advanced tab, and finally Virtual memory. You can either let Windows manage it or set custom values.
Here’s a quick comparison to help you decide:
| Option | Benefit |
|---|---|
| Let Windows manage | Automatic, less hassle |
| Custom size | Fine-tuned for your needs |
| Too small | May cause system instability |
| Too large | Wastes disk space, can slow performance |
| SSD vs HDD | SSDs handle virtual memory faster |
Choose the option that fits your needs best.
Keeping Windows and Drivers Up to Date
Stay ahead of performance issues by keeping Windows and your device drivers up to date. Updated software ensures your system runs smoothly, efficiently optimize RAM Windows 11 and manage system resources. Microsoft frequently releases updates that fix memory leaks, improve compatibility, and patch security vulnerabilities. To check for Windows updates, open Settings, go to Windows Update, and click “Check for updates.” Install any available updates promptly.
Next, focus on your device drivers, especially those for your graphics card, chipset, and network adapters. Outdated drivers can cause memory mismanagement and system instability. Visit your device manufacturer’s website or use Windows Update to find the latest drivers. By regularly updating both Windows and your drivers, you’ll minimize memory issues, reduce crashes, and keep your computer running at its best.
Utilizing Built-In Troubleshooters for System Optimization
Run the “System Maintenance” troubleshooter first, as it checks for unused files and shortcuts that could slow your PC. If you’re experiencing specific problems, try the appropriate troubleshooter from the list. Let Windows identify and fix potential bottlenecks. By using these built-in options, you can quickly optimize RAM Windows 11 and free up valuable memory without installing any third-party software.
Frequently Asked Questions
Can Third-Party RAM Optimizers Improve Windows 11 Performance?
You might think third-party RAM optimizers boost Windows 11 performance, but they rarely help. Often, they simply clear cached memory, which Windows manages efficiently on its own. You’re better off letting Windows handle memory without extra tools.
Does Upgrading RAM Physically Affect Virtual Memory Settings?
When you upgrade your RAM physically, you don’t automatically change your virtual memory settings. However, with more RAM, you can adjust your virtual memory (paging file) size for better performance, but it’s not required to do so.
How Does RAM Usage Differ Between Windows 10 and Windows 11?
You’ll notice Windows 11 generally uses more RAM than Windows 10, mainly due to its enhanced visuals and additional background processes. If you’re upgrading, ensure your device meets the higher RAM requirements for smooth performance.
Is Readyboost Still Effective for RAM Optimization on Windows 11?
You’re wondering if ReadyBoost still helps with RAM optimization on Windows 11. It’s not as effective now because modern systems have faster SSDs and more RAM, so you’ll see little to no performance benefit using it.
Can Overclocking RAM Impact System Stability in Windows 11?
When you overclock your RAM, you’re pushing it beyond standard speeds, which can boost performance but may cause system instability. You might see crashes or errors if your hardware or BIOS settings aren’t properly configured for higher speeds.
Conclusion
By following these free tips, you can easily optimize your RAM usage on Windows 11 without spending a dime. Keep an eye on resource-hungry processes, disable unnecessary startup programs, and turn off background apps you don’t need. Use built-in tools like Storage Sense and the Memory Diagnostic Tool for extra help. Don’t forget to keep your system and drivers updated. With these steps, you’ll enjoy smoother performance after you optimize RAM Windows 11 using these tips.